NZcaver wrote:Alan - good idea incorporating several descender options. I humbly suggest showing the process with a micro-rack, full-size rack, and Petzl Stop (and/or Simple bobbin) at the very least. I also suggest whoever models the demo does so with a "clean" rig - ie just the harness, Croll, upper ascender, footloop, cowstail, and descender. Maybe add a third ascender to the cowstail (or separate QAS-thing) when needed to change over with the loooong rack.
If you wanted to get fancy, you could even take the photos and turn them into illustrations using Photoshop. Then grey-out non-essential parts of each image, making it easier for people to interpret the important bits at a glance. Just an idea.
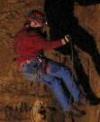
Good suggestions!, we have already completed instructions for changing over from ascent to descent with a small/micro rack, and a standard SMC rack, unfortunatly i do not have a bobbin or overly large rack on hand, i can however do one with a standard rack and just implement the usage of a third descender to show what you will have to do with a loooong rack.
I have a couple people currently looking over these guides and seeing that they are clear, and show the PROPER technique. Its actually quite fun!


 Now having the print-on-demand option through Lulu as well, everyone's happy. I still have my well-worn 1988 print edition somewhere too...